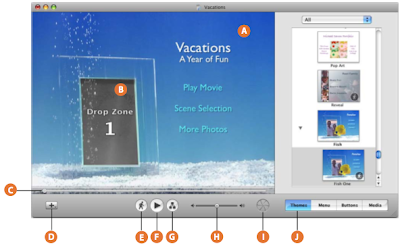
 A - DVD menu: This is where you see the DVD menu you are creating as you build it.
- Drag movies,pictures, and audio files into this area to create buttons that play your movies and slideshows, or change the look and sound of the background.
C - Scrubber bar and motion playhead: Drag the playhead along the scrubber bar to move slowly through a motion menu.
- For themes with dynamic drop zones (drop zones that move), the playhead lets you stop the motion so you can drag movies or photos into them.
- You can add a slideshow, movie, or submenu.
- This makes it easier to work on motion menus.
- In preview mode, a DVD player remote control appears on the screen, and you can use it to navigate through the menus and play the slideshows and movies as though you were viewing them on a television.
- The map view helps you edit and navigate more easily through your iDVD project.
- This does not change the volume of your finished DVD project.
J - Editing panes: Click these buttons to open editing panes for iDVD.
Themes Pane:
You use the Themes pane to select a theme for your project.
When you select a theme from the themes list, it appears in the iDVD window.
To see the Themes pane:
- Click the Themes button in the iDVD window.
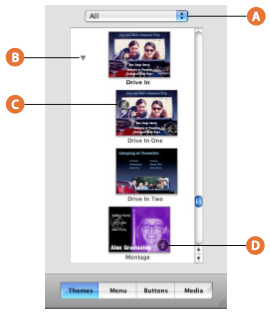 A - Theme set: Choose a theme family to preview or choose All to view all the themes at once.
B - Themes list: Scroll through the themes that appear in this list to select one for the menu you are creating.
- Click the triangle next to a theme family to see all the menus for a theme.
D - Motion icon: Themes with a moving background show the motion icon in one corner of the thumbnail.
Menu Pane:
You use the Menu pane to add content to a menu or drop zones, and edit the look of text on a menu.
To see the Menu pane:
- Click the Menu button in the iDVD window.
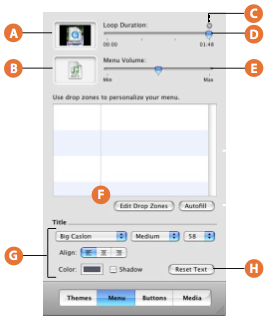 A - Background well: Drag images or movies into this well to make them appear as the background of your DVD menu.
B - Audio well: Drag sound files here to make them play as the background music for your DVD menu.
- Click the speaker icon to turn the sound on or off as you work.
- Drag the left half of the slider to set where the video begins, then drag the right half to set where the video ends.
E - Menu Volume slider: Drag this slider to set how loud the background audio plays. This control affects the volume of your DVD.
F - Drop zone controls: Drag images or movies to fill the drop zones in the list, or click the Edit Drop Zones button to open the drop zone editor.
- Click Autofill to have iDVD automatically fill the drop zones in the menu with images from your project.
- Click the pop-up menus to change the font, font style, or font size.
- Set the alignment of the text on the menu.
- Add a shadow to the text, or click the Color box to choose a different text color.
Buttons Pane:
You use the Buttons pane to change the shape, size, position, and color of buttons on amenu.
To see the Buttons pane, click the Buttons button in the iDVD window.
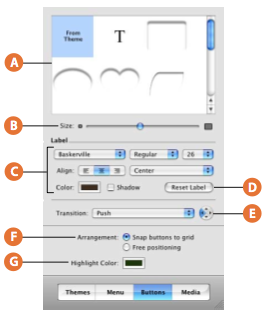 A - Button list: Select a button shape in this list.
- Select the “T” for a text-only button. Different themes provide different button shape options.
C - Label text controls: Use these controls to customize the look of the text labels for buttons.
- Click the pop-up menus to change the font, font style, or font size.
- Set the alignment of the text on the button.
- Add a shadow to the text, or click the Color box to choose a different text color.
E - Transition pop-up menu and direction controls: Choose a transition that moves the viewer between the button and the action that follows it, such as playing a movie.
- With some transitions, you can use the arrow buttons to pick a direction for the transition to move.
G - Highlight Color well: Click the box to select a highlight color for buttons when they are selected in a menu.
Media Pane:
You use the Media pane for easy access to the movies, images, and music stored on your computer.
The three illustrations that follow show the controls in the three panes of the Media pane.
- To see the Media pane, click the Media button in the iDVD window.
Audio:
You use the Audio pane to add songs and other recordings to your DVD.
- To see the Audio pane, click the Media button in the iDVD window, then click Audio at the top of the Media pane.
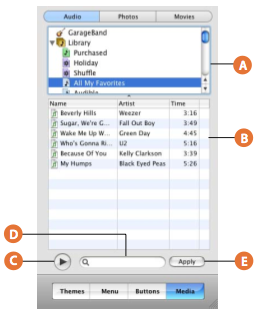 A - Audio source list: Select GarageBand, an iTunes playlist, or Library to add your own compositions or songs in your iTunes library.
B - Songs list: Drag a song or playlist from here to an audio well to set the background music for a menu or slideshow.
C - Play button: Click to listen to the selected song.
D - Search field: Type a song name in the search field to locate it.
E - Apply button: Select a song or playlist and then click Apply to make the selection the background music for a menu or slideshow.
Photos:
You use the Photos pane to find all of the photos in your iPhoto library and quickly add complete albums and slideshows to your project.
- To see the Photos pane, click the Media button in the iDVD window, then click Photos at the top of the Media pane.
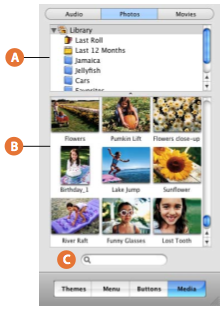 A - iPhoto albums list: Select the iPhoto album or library that contains the photos you want to use.
- Drag an entire album to the menu, or scroll through the photos in the selected album shown in the list below.
- Drag a photo or a group of photos to a menu background or to drop zones.
Movies:
You use the Movies pane to locate the movies that are stored on your computer and add them to your project.
Movies stored in the Movies folder on your hard disk appear automatically, and you can add movies from other folders as well.
- To see the Movies pane, click the Media button in the iDVD window, then click Movies at the top of the Media pane.

A - Movie folders list: The Movies folder in your home folder appears in this list, making it easy to locate your movies while you work in iDVD.
- You can add any folders where you store movies to this list by making selections in iDVD preferences.
- You can add movies to the list by dragging them from the Finder.
D - Search field: Type a movie name in the search field to locate it.
Project Info Window:
You use the Project Info window to keep an eye on your iDVD project resources and monitor the space available on your hard disk and the disc you’ll burn to.
- To see the Project Info window, choose Project > Project Info.
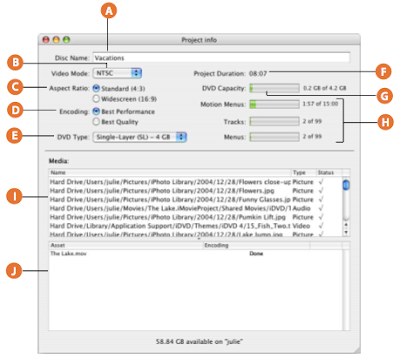 A - Disc Name: Type a name for the disc.
- The disc name can be different than the name of your saved project.
- NTSC is used in North America, Japan, and some other non-European countries.
- PAL is used in most European countries.
- Standard television screens have an aspect ratio of 4:3
- Widescreen televisions have an aspect ratio of 16:9.
- Best Performance takes less time to burn, while Best Quality takes longer to burn but provides the best quality possible.
F - Project Duration: See the playing time for all the content on the DVD.
G - DVD Capacity: See how much space is left in your iDVD project.
- Clicking the text on the right switches between disc space in gigabytes (GB), and time in minutes.
- The project’s size is limited by the size of the DVD disc.
I - Media list: See the media included in your project.
- This list also shows the file type and its location.
- A checkmark in the Status column indicates the file is available.
- The Encoding column indicates whether the movie has been encoded.
- When you click the Burn button, iDVD will finish encoding the movies before burning the disc.
Drop Zone Editor:
The drop zone editor displays all the drop zones in a menu so you can quickly add images or movies to them.
- To see the drop zone editor, double-click a drop zone, or click the Edit Drop Zones button in the Menu pane.
 A - Close button: Click to close the drop zone editor.
B - Background well: Drag an image or movie here to change the existing background for this menu.
C - Audio well: Drag an audio file from the Media pane or another location on your computer to add a soundtrack for the menu.
D - Drop zones: Drag images or movies from the Media pane or another location on your computer to add them to the menu background.
Slideshow Editor:
The slideshow editor displays all the photos in the selected slideshow and provides controls for you to set up how the slideshow plays.
- To see the slideshow editor, double- click a slideshow button or an image in a drop zone slideshow.
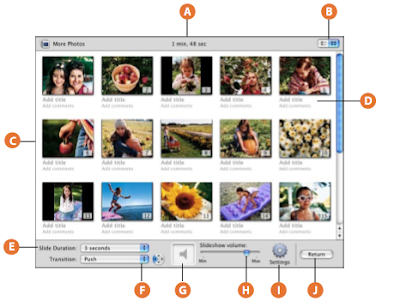 A - Slideshow length: See how long the slideshow will last in minutes and seconds.
B - List or thumbnail view: Click to switch between a list of slides or a thumbnail view.
C - Slideshow photos list: Scroll through the list to see the photos in this slideshow.
- Drag the thumbnails to rearrange the order of the photos.
- Only what you type is shown; the placeholder text is not shown.
- When you add a soundtrack, this is automatically set to “Fit To Audio” so the slideshow and the soundtrack finish at the same time.
- With some transitions, you can use the arrow buttons to pick a direction for the transition to move.
- Hold the pointer over the sound file icon in the audio well to see the song’s title and length (or the title of the first song in a playlist).
- Move the volume slider left or right to adjust the volume of the audio.
I - Settings button: Click to show slideshow options.
- You can add Back and Forward visual indicators to the slideshow, set the slideshow to repeat (loop), add files to the DVD-ROM contents, and show or hide titles and comments.
Map View:
You use map view to get a bird’s-eye view of your DVD project.
Map view provides a visual representation of how all your submenus, slideshows, and movies are linked together.
You can also edit your DVD menus directly in map view, adding or removing elements from your project, and check for errors before you burn a DVD disc.
- To see map view, click the Map button at the bottom of the iDVD window.
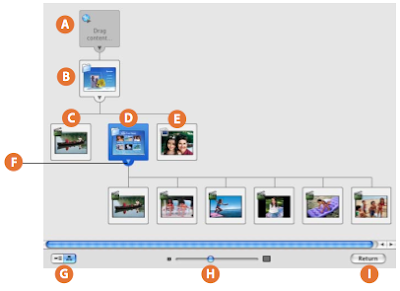 A - Project icon and autoplay well: The first icon in the map is the project icon.
- Drag a movie or slides to the autoplay well to make them play before the main menu appears on the DVD.
- Double-click the image in the well to preview the autoplay movie or edit a slideshow.
- Double-click this icon to open the main menu.
- You can drag movies and slideshows here to add them to the menu.
- Double- click here to play the movie.
- Double-click here to go to the scene selection menu.
- Double-click here to go to the slideshow editor for that slideshow.
- Click again to reveal the linked items.
H - Zoom slider: Drag to see more of the project or to see an icon up-close.
I - Return: Click to exit map view.
